Showing posts with label repurpose. Show all posts

Thursday, 8 September 2016

Repurposed Wood Bug Hotel


For some time now, I've wanted to make a bug hotel. But I could never quite get my hands on the right materials. Though I could have quite easily gone out and bought wood to make one (or bought a ready made one), I wanted to go the upcycled route and use something that had outlived its original purpose.


So this rather worn-out little wooden sleeve ironing board, which I found at the charity shop, was perfect!

Saturday, 23 July 2016

Vintage-Style Leather Cuff


Over the past few days I've brought you leather cuffs of several different styles. Leather & chain, painted leather, and even leather using spacer bars as decoration.

This is the final post of the set (for now) and can once again make use of upcycled materials!

If you've got an old brooch knocking about that you never wear, this is the craft for using it!

Friday, 22 July 2016

Painted Leather Cuffs (Plus a Paint-Free Bonus DIY!)

Yesterday, I posted a tutorial for a leather & chain cuff, and said I'd post more ideas.

Today I'm bringing you painted leather cuffs, in two styles--plus a bonus, paint-free style, for those who don't trust themselves with a paintbrush!

These can look a little daintier, and you can go wild with colour combinations--your only limit is the colours of leather/paint you can get your hands on!

As I mentioned yesterday, this is a good upcycling project for bags/garments no longer usable, and you can use faux leather too.

DIY painted cuffs

Thursday, 21 July 2016

Leather & Chain Cuff DIY


I started making leather and suede cuffs when I was a kid. Mum bought some suede scraps and some eyelets, and showed me an old choker one of her old work colleagues had made. Then we made our own!

This is an updated version of our DIYs. I made it back in April along with some others, after finding some leather scraps at a local market (and then I forgot to post about them...oops!)

Leather cuffs - or suede ones! - would make a great upcycling project if you have an old and knackered leather/suede handbag or garment that's outlived its original use.
Of course, you can also use faux leather for this!

These are relatively simple to make. In fact, this one is the most complicated of the bunch I ended up making. Which isn't really that complicated at all.

Here comes the tutorial!

Monday, 11 January 2016

Letterzines Inspiration


When I shared 6 Ways to Repurpose Old Christmas Cards, one of the methods I mentioned was Letterzines.

If you like writing letters but want to get more creative with what you send, this post is for you!

A letterzine is a cross between a letter and a magazine. Along with the usual hellos and how-are-yous found in a letter, a letterzine is filled with images and information, hand-decorated and tailored to each individual recipient! This is a fun way to reuse or repurpose wrapping paper, magazines, or any other paper-based imagery.

This post is intended to give some inspiration for what you could include in yours.

Monday, 4 January 2016

6 Ways to Repurpose Old Christmas Cards


It's the New Year, and you're probably taking down Christmas decorations, and amassing a huge pile of Christmas cards to go into the recycling.
Maybe you're looking at some of the artwork reluctantly, thinking, "It seems such a waste to just throw these away..."


You're right. 
Which is why I've been beavering away to put together this post of 6 Ways to Repurpose Old Christmas Cards.
For the most part, these little crafts are easy--if you can cut and stick, you can do these!
Some of these will also help you save some time next Christmas.
Some are best done now, whilst some are worth leaving until closer to the festive season, when - provided you've dedicatd some time to chopping up old cards this January - you'll have all you need to crack on with some Christmas crafting (without having to fork out for expensive store-bought stuff).

So, starting with the most obvious...

Thursday, 11 December 2014

Upcycled Festive Heart Decorations


Yesterday I made these Scandinavian-inspired heart decorations for our Christmas tree. They're very simple to make, and almost completely upcycled!

The method is so easy it's guessable, so I didn't make a proper tutorial, but here's a quick run down.

I used:
Template (from junk mail)
Fabric (old pillowcase)
Filling (from knackered old pillow)
Embroidery thread (from charity shop)

Using the template, I cut out hearts and sewed them right sides together, leaving a gap for turning.

Then I turned them so the right side of the fabric was facing outwards, and stuffed them with filling.

After sewing up the gap, I threaded a darning needle with 5-6 inch lengths of embroidery thread and pushed it through the top of the hearts, tying the ends in a knot to make a loop.


Here they are on our tree! Also seen here are several homemade items I've posted about in the past:
Recycled Magazine Garland
Tin Can Tea Light Holders
Felt Doves and Peace, Hope & Joy Stars Decorations

Sunday, 1 June 2014

Vintage Measuring Tape Belt

vintage measuring tape belt

Though I’ve been massively sidetracked by Doing A Thing, today I sat down and made this belt from a vintage measuring tape.

This is a project that’s been in my To Do pile for a long time, which is ridiculous considering how easy it was.

Read on for a how to. This project is simple and doesn’t take all that long: fifteen minutes at the most.

Saturday, 16 November 2013

DIY Spoon Decorations


As long-time readers will know, I volunteer in a charity shop and utterly love putting together window displays! The manager had decided for the Christmas window to be done this week, so I made these unique spoon decorations from some donated spoons, to go on our Christmas tree!


Thought I’d take pictures along the way, so I can share this DIY.

This is a DIY that will require the use of power tools. Such things are scary and I am clumsy lately, so I enlisted the help of my Dad :)

Thursday, 8 August 2013

The Curtain Skirt: DIY

curtain skirt tutorial

Do you keep a list of all the projects you’d like to do?

Something from my project-in-waiting list was this ‘curtain skirt’, made from what I think is a curtain fabric sample, found at a charity shop!

skirt DIY

Tuesday, 19 February 2013

Bottle Necklace

Bottle necklace tutorial


Whilst browsing the internet recently, I found some cute bottle necklaces! I have a few little glass bottles that I’ve kept since childhood, so decided to turn them into necklaces!

DIY Dolly Kei Bottle necklace

It doesn’t take much to make a simple necklace, just wire, chain and basic jewellery findings. After making the first, I made more and took pictures so I could share this tutorial!

Second-hand Shopping


It always happens. Just as I decide to curb my spending a little, I get the overwhelming desire to hunt for bargains--and usually find something, too. It's also one of the perils of volunteering at a charity shop. There will always be something you want, right there, tempting you from the rail or shelf or display...

Nevertheless, I'm pretty pleased with my recent second-hand shopping haul!

Friday, 21 September 2012

Circuit Board & USB 'Dog Tag' Necklace


What do you do with a broken computer mouse? Or anything else that plugs into the computer, for that matter?

Throw it away? Toss it into a cupboard and forget about it?

Hold your horses!
Don’t just toss it, cannibalise it!

Unscrew screws, cut wires, take stuff out that you can use (and drop off any leftover metals at your nearest recycling point!). Just be careful if you’re playing with anything that might hold an electrical charge, and watch for sharp edges.

Amongst a heap of broken computer stuff I was given for crafting with, was a broken card reader (I think that’s what it was anyway!) Basically a bit of plastic with a bit of circuit board inside, attached to a USB plug.

I wanted to make something with a more masculine edge to share with you here, so this is what I came up with:


My inspiration was dog tags. The circuit board especially reminded me of a tag.
As I happened to have a necklace with multiple strands of ball chain, I took a strand off to use for this craft :)

Of course I have a tutorial for you too. So if you’re looking for a little inspiration or what to know how to make one of these USB and circuit board necklaces.

Friday, 18 November 2011

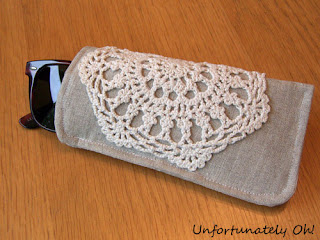
Tutorial: Doily Glasses Case

Well, I couldn’t stop at a phone case when it came to doilies.
I made a matching sunglasses case:


Again, it was something I needed! My awesome sunnies (hand-me-downs from my Mum) did come with a case, but the lining was breaking up--every time I took the sunglasses out, they were covered in bits of black dust!

The sunglasses case turned out to be much easier to make than the matching phone case, though the method is pretty similar!

Here’s an easy-peasy sunglasses case tutorial.


Time needed: approx 20 mins (excluding glue drying time)

You’ll need:
Old, flat sunglasses case that fits your sunglasses
Pencil
Fabric
Lining
Interfacing
Doily (or doilies)
Fabric glue


1. Draw around the sunglasses case onto the interfacing and cut out leaving 1cm seam allowance. (As with the phone case, I cut two layers of sew-in interfacing to get the desired thickness).


2. Cut a piece of fabric and lining the same size, using the interfacing as a guide. Iron the interfacing to the back of the fabric if using that type.


3. Make a sandwich with the lining, fabric and interfacing, ensuring the fabric is in the middle.


4. Sew around the edge of the sandwich, leaving a few inches gap along one edge.


5. Clip the corners and turn the case the right way around. Fold in the un-sewn edge and sew right along that edge, including around the corners. (I forgot to take a picture of this part, sorry!). This side will be the mouth of the case.


6. Fold the case in half with the edge you just sewed on one end. Pin the other sides and opposite end together and sew. 


7. Glue on a doily and you’re done!


This will probably be my last doily craft for now, until I get my hands on more! 

Will be linking up at all the usual link parties, found in the side bar :)

Saturday, 15 October 2011

Tutorial: Pillowcase Shopping Bag

A while ago I posted about some cute retro pillowcases that I picked up from the charity shop. As usual, they lived in a drawer whilst I became distracted with jewellery!
This week, however, I made up my mind about what to do with one of the pillowcases.
So here is my upcycled, eco-friendly, repurposed, super-duper pillowcase shopping bag!

This is probably the easiest thing I could have created, since it made use of the existing shape of the pillowcase. I lost track of how long it took to make the bag since I had to go and do other things a few times!

I think this is a great way of using old pillowcases and of course, using cloth shoppers is much better (and looks much cooler) than relying on plastic carrier bags!

Want to make your own? Here’s a tutorial:


You’ll need:
An old pillowcase
Trim (optional)
Dressmaking chalk/similar
Ruler
Sewing machine


1. Measuring from the bottom seam of the pillowcase, draw a line across at the desired height of your bag (mine was 17 inches). Then draw a second line 2 inches above the first.


2. Cut off at the upper line.


3. Turn the bag piece inside out and reinforce the stitching on the sides. Then bring the two corners together. Place a pin 1 inch from each corner, across the seam.


4. Sew across each corner where you pinned to give the bag a squared base.


5. Unpick the stitching at the top part of the pillow case (I didn’t need to do this as it was already coming undone!) then cut the top three inches off both sides. These will be the straps.


6. Fold over the sides of one of the pieces you just cut, ensuring the pre-hemmed side is on top. Pin and sew.


7. My stitching is a bit rubbish and the pillowcase had a small hole in it, so I used trim on the bag and straps to hide this! ;)


8. Fold over the top two inches of the bag and pin and then pin on the straps. Sew on with two rows of stitching.


9. To strengthen the straps, sew a rectangle where the strap and bag are joined, with an X in the centre.


10. Show off your bag to envious onlookers at your local shop ;)

Will be linking up  at the parties in the side bar!

Sunday, 14 August 2011

Carpet and Thread


Remember the interiors samples I posted about recently, along with the big bundle of embroidery thread?
It was the carpet sample that I had more trouble finding a use for, but after a brainwave moment in Poundland, I got out the sample and some of the embroidery thread, and made this simple framed decoration (I think calling it artwork is pushing it a bit!)

 
The frame came from Poundland; everything else was free!

Putting this together was so easy!
The carpet sample was a little big for the frame, so I cut it down with a Stanley knife, then used scissors to trim about 1cm of the fibres off around the edge:


After that, I simply wound four lengths of embroidery threads around the carpet sample so that they overlapped:


(I secured the ends of the threads at the back with a bit of tape)


This currently sits on the desk in my room, hiding the plugs!

Linking up to the parties in the sidebar!

Thursday, 7 July 2011

Tutorial: Old sock pincushion

If there’s one thing I have lots of, it’s socks. Ankle socks, knee socks, over-the-knee socks, stripy, spotty, heart-print, cute characters--I like them all!

The only problem with socks, like other items of clothing, is that they wear out. And there’s only so much patching and sewing that can be done before a sock is no longer wearable.

Usually, once a sock is too worn out to wear anymore, I’ll either put it in textile recycling or I’ll keep hold of it and use it for stuffing small projects.
But sometimes the print is too cute to stuff into a lavender-scented heart, so I tried to find another project to use up an old sock, and came up with this pincushion:

I only bought these socks at Halloween, so was disappointed they wore out so fast!

This was so simple to make that anyone can do it, and makes use of a whole pair of socks.
So grab your holey old (clean!) socks, wield your scissors, and check out this quick tutorial!


Time needed: 5-10 minutes (approx)  

You’ll need:
Old socks
Scissors
Needle and thread
Sewing machine (optional!)


1. Cut off the foot of the sock just above the heel and also the band at the top of the sock. Put these two pieces aside.


2. Turn the centre section inside out and sew up both ends, leaving a gap of a few centimetres at one end in order to turn the cushion back the right way.


3. Trim off the trailing threads and turn back the right way. Use the remaining sock pieces and other sock of the pair to stuff the cushion.


4. Sew up the gap by hand, and you’re done!

 
When I first came up with this, I wasn’t completely sure whether it would work, but it turns out that old sock is a great base for a pincushion! The pins slide in and pull out easily, without snagging or falling out. Success!

Come back again to see the other pincushions I made recently--because yes, a girl really does need more than one!
Related Posts Plugin for WordPress, Blogger...