Showing posts with label accessories. Show all posts

Sunday, 1 June 2014

Vintage Measuring Tape Belt

vintage measuring tape belt

Though I’ve been massively sidetracked by Doing A Thing, today I sat down and made this belt from a vintage measuring tape.

This is a project that’s been in my To Do pile for a long time, which is ridiculous considering how easy it was.

Read on for a how to. This project is simple and doesn’t take all that long: fifteen minutes at the most.

Saturday, 3 November 2012

Keyboard Key Brooch


Are you a computer geek? Perhaps you know a computer geek. Or maybe you just think that keyboard keys are cool.

I have a bag of keyboard keys, because I think they can look cool (and I’d like to be a computer geek, but I don’t have the brains). They came from various defunct keyboards and although I’ve collected them up with different projects in mind, this brooch happened:

Pacifist Geek Chic?

On top of a new pile of keyboard keys, I acquired a bit of circuit board from a broken ‘computer thingamy’ (I think it was a keypad of some kind, but it came to me with stuff broken off and no housing, so I’m not sure).

Here’s how to make a little keyboard key brooch of your own.


You’ll need:
Keyboard keys
Backing for brooch (I used a piece of circuit board)
Brooch back
Strong glue
Cutters or a small saw
Sandpaper

Wednesday, 17 October 2012

A Top Hat for Halloween


To continue from my recent post about customising hats, here is another that I got my hands (and glue gun) on.

This time around, my inspiration was the hats of Kikirara Shoten, a fantastic purveyor of weird hats, unusual corsets, and unique accessories in Japan.

The hat is a basic top hat from a fancy dress shop. Sadly it’s a bit tight on my head, but I love how it turned out!


I used multipurpose glue to attach gathered lace trim around the brim. This hides the ugly brim edge that screamed ‘I bought this from a party shop’! Then I added a piece of ribbon (to replace the hideous plastic one) and glued on a strip of marabou. 


Everything else is attached with a glue gun. Hooray for glue guns!
This little picture frame feature on one side is my favourite part.

I didn’t buy anything specifically for this hat: aside from the frame and bats, everything was left over from other projects. The frame came from a charity shop (more recently I used another one to make a necklace) and the bats were amongst my Halloween decorations.


Admittedly the bat side doesn’t look as ‘cool’. I didn’t want this side of the hat to draw too much attention from the picture frame, so went for something simpler. In hindsight, perhaps I should add some extra decoration!


Here are some unusual hats I’ve found online that have particularly tickled my fancy.


Will be linking up to the parties listed below!

Saturday, 13 October 2012

Creepy Fingers Tiara


As a cheap Halloween headdress one year, I knocked together this quick, cheap and easy ‘creepy fingers tiara’.


Here’s what I used:
Nine ‘witch fingers’
Alice band
Cardboard
Hot glue & glue gun
Spray paint
Scissors


First off, I cut a piece of cardboard with tapered ends, wider than the alice band, to give it more of a ‘tiara’ shape and appearance.


I glued this on with hot glue and then added the witch fingers in a slightly arched shape, again with hot glue.


After that, I just gave it a few coats of silver spray paint!


This is a really cheap and somewhat ‘slap-dash’ project, but easy to cobble together at the last minute for a fancy dress party, or for a silly accessory to wear when answering all those calls of ‘Trick or Treat’! 


Will be linking up to the parties listed below!

Thursday, 11 October 2012

Feather Hat Makeover


Hats seem to be a ‘thing’ in fashion at the moment, especially when you look at some of Louis Vuitton’s ad campaigns (seriously, can those hats get any bigger?)

Inspired by this and a hat I saw in a fashion magazine, I customised one of my old hats with some bits and pieces I had in my stash!


The original hat (a charity shop purchase, naturally) had a wide brim and a fairly shallow bowl, almost what is known as a ‘floppy hat’ but with less flop!.


To change the shape and height of the hat, I cut a rectangle of fabric about 1.5x a loose measurement around the bowl, and just over twice what I wanted the new height to be.
I stitched the long edges together loosely and pressed the fabric slightly so that the seam was in the centre back. Then I put a widely-spaced running stitch through the centre in order to gather it.


I wrapped it around the hat and sewed the ends together (folding in the raw edges).
Then I stitched it to the brim, with a few stitches in the bowl to hold it better. 


I then put stitches in to hold the fabric together at the top of the hat and create more shape, and added a length of velvety ribbon around the centre, stitching it to the hat at the back.

All of this was done fairly carelessly, if I’m honest--I didn’t even use the ‘right’ side of the fabric! I wanted the hat to have a slouchy, uneven appearance. 


When it came to the feathers, first off I used a short off-cut from a cheap feather boa, which I had left over from a fancy dress costume. I stitched this on with the same level of care (hah!) as everything else, and then added the ostrich plume on top.

The plume is pretty old. Apparently it came from my grandma’s place and has some link to funerals. Cheerful, right?! It’s slightly damaged and a little faded but is far more luxurious than the modern one that I stuck in the back of the hat! 


Admittedly, the modern feather was chopped in half in attempt to make it look ‘fuller’. I hope to eventually replace this feather with a number of them as I think it will look nicer!

Sadly I haven’t had the chance to wear this hat out yet--the British weather has predictably turned very wet! 


Will be linking up to the parties listed at the bottom of the page!

Thursday, 27 September 2012

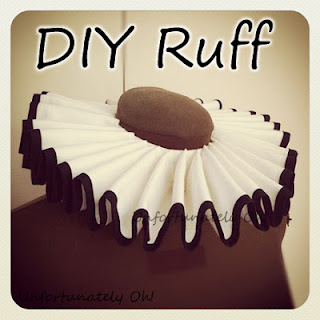
DIY Ruff


Ruffs are one of those iconic pieces that have carried through the ages - seen on nobles of the mid-sixteenth century, jesters, pierrot, clowns, and even the catwalks of today.

It’s easy enough to cobble together a quick elastic-and-fabric ruff, but if you’re looking for something that ‘stands up’, it’s necessary to take a little more time over the construction. 

 
These ruffs were all made for ‘cosplay’, therefore the designs are not mine, but having made them I can appreciate how much work went into the originals! (If you’re wondering, I reproduced costumes worn by Kozi, guitarist of Japanese band Malice Mizer).


Ever since making them, I’ve had a few people ask how to put them together! The first ruff I made (black and gold, above) was constructed based loosely on some instructions I found on the internet. Unfortunately the web site with these instructions has gone to the internet graveyard, so I’ve never been able to share links with people.

As a result, I thought I’d put together this tutorial!

I haven’t made a ruff from scratch for this, so some of the photographs are from the ruffs above. I used some off-cuts and fabric scraps to create process shots, so it should all be clear.
I’m not gonna lie. This will take you a LONG time.

So to find out how to make a ruff, read on!
It’s quite lengthy, so go and make a cup of tea first :)
 

Saturday, 14 April 2012

Zip Clutch Tutorial


Remember this zip clutch? It was my submission for the Naughty Notions Challenge, run by Keren and Rikka! (The challenge they most recently hosted was the Typography Challenge. Read about my entry here and vote for your favourite here)

As I wrote before, the clutch gave me a bit of a headache and there was some trial and error involved in its production. But it was worth it--the clutch looks fab and I won silver! (Check out the other winners here)

Anyway, I finally got around to writing a tutorial for this bag. Pictures are somewhat limited this time (sorry!) as I forgot to take them.

...Okay, I’ll confess: I didn’t write a complete tutorial. I skipped the first part. Mainly because the hinge frame bag tutorial over at Bag’n-telle explains it perfectly—so check it out first for how to draft a pattern best suited to your hinge frame and your needs. (Then come back here…you will, won’t you?!)

You’ll need:
Pattern
Lots of zips
Outer shell fabric
Interior fabric
Bias binding (to match or contrast with interior fabric)
Chains
Jump rings
Cottons to match your zips
Hinge frame
Strong glue (I used E6000)

Tools:
Ruler, set square etc for drafting pattern
Tailor’s pencil/dressmaking chalk
Scissors
Wire cutters
Sewing machine with zipper foot
Needle
Flat nose pliers
Something with a rounded point (I used flat-nose pliers)


Saturday, 31 December 2011

End of Year Recap!

First off, a very happy new year to everyone! I hope you all have an amazing 2012 and that and problems or hardships that you are passing into the new year with, are soon solved.
For me, 2011 has been very much an 'up and down' year, with both positive things and times I have struggled. Nonetheless, I'm looking forward to 2012!

Since its the end of the year (and lots of other bloggers are doing it) I thought I'd share my top ten most viewed posts!

Thursday, 2 June 2011

Antique Bag


This gorgeous antique bag was given to me recently by my Nanny. It is a part of my family history--this is the bag that my great-great-great grandmother took on her honeymoon!  She married in 1870, so this bag is a good 141 years old!

Born in 1845, my great-great-great grandmother was a midwife and died in 1934 at the ripe old age of 88.

Obviously I never knew this ancestor, but judging by the obituary in the newspaper clipping that I was shown, she was a very well-known, popular lady!

I’m so proud to own a piece of the family history--especially something as fantastic as this!

Friday, 13 May 2011

Cassette Tapes: Reuse and Refashion!

Everyone has the odd cassette tape (or ten) lurking around in their abode. A relic of the 20th Century, cassettes are rarely used these days, forsaken in favour of the CD and the mp3.

But it seems rather wasteful to just trash all those unwanted tapes, doesn’t it? 


Having found a pile of home-recorded cassettes that I didn’t want, I decided to do something with them. Repurposing always beats trashing!


Cassette tape bag
I made this using a tutorial on Instructables
I love the trashy, handmade look; the bag is quite floppy despite the sturdiness of the tapes so is a fun accessory to a slouchy, 80’s inspired ensemble!
Because I wanted a way of closing my bag, I changed the design slightly compared to the one in the tutorial. I also added a long strap, which I attached with big safety pins.
This bag makes use of the cassette casing, the cases and the tape inside.


Reel earrings
These were a little bit fiddly to make--mostly because of the rhinestones! I spray painted the reels silver and then glued flat-backed rhinestones around the edge.


Reel and chain necklace
Again, I spray-painted the reels on this one. I attached them to a plain chain and added short pieces of chain for effect.


Reel and beads cross choker
This time I joined some reels together into a cross shape, using thin ribbon. I added a jump ring to the top of the cross and put it onto a piece of bent wire to form the necklace. I added metallic beads and tape guides (the small plastic wheels) to finish off the piece.

Obviously these are only a few ways of reusing cassette tapes! A quick Google search will throw up tonnes of ideas and inspiration. How about a cassette tape lamp, bracelet, or wallet?
There are plenty of tutorials online--your only limit is your imagination!


Linking up at:

Sunday, 1 May 2011

Tutorial: Gothic Comedy Scarf

Nearly all magazines come with a handful of inserts that usually go straight in the recycling bin. But recently amongst the oft-unwanted junk was something interesting: a pamphlet for Joe Browns.

The brand in question has a large collection of to-die-for clothes and accessories, all of which are stylish, gorgeous, and practical with it!
One thing that caught my eye was the ‘Funky Buddha Scarf’. At £19.95 it isn’t particularly overpriced, but I’m one of those people that would rather save the money and spend a couple of hours making something for less!

So here is my take on the Funky Buddha Scarf:

‘Gothic Comedy Scarf’
And here is the original by Joe Browns:

As you can see, there are several differences between my version and the original!
Basically, I made this using things I had in my creative stash, rather than shelling out on fabrics, beads and whatnot.

I’m a bit of a goth at heart, so used some black cobweb lace left over from an old project. Instead of chunky beads I used some large jump rings, and the comedy mask charm has been floating around in my bead box for about a decade!

Since I’m all about sharing (and it’s so easy to make this), here’s a tutorial!


Time needed: 60-90 minutes

You’ll need:
60x150cm (approx) lightweight fabric (choose something that doesn’t fray)
Charm for centre of scarf
Bail for charm (I used a split ring from an old keychain)
6 large jump rings
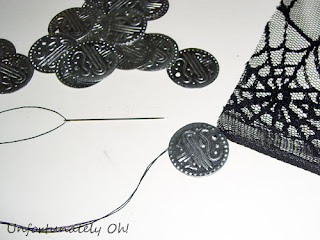
Belly dance costume coins
Needle & thread
Scissors
Jewellery pliers


1. Hem your fabric on all sides if you wish (I didn’t because I could get away without doing it!) Put a bail on your charm if it doesn’t already have one, and thread onto the centre of the fabric.


2. A couple of inches from the charm, fix three of the jump rings around the fabric. It helps to twist the fabric here to keep it tightly together. Close the jump rings with pliers. These will stop your charm from sliding off the scarf.
Repeat on the other side of the charm.


3. Sew the coins to one end of the scarf, evenly spaced. I used 9 coins on each side.


4. Tea break!


5. Sew coins to the other end of the scarf.


6. Enjoy your new, cheaply-produced scarf!!!


Variations:
  • As with the Joe Browns scarf, try out large beads instead of split rings...
  • ...or put knots in the fabric.
  • Sew beads or trim to the ends of the scarf
  • Add three charms rather than one

Linking up at:
The Girl Creative Anything Related
Related Posts Plugin for WordPress, Blogger...