Showing posts with label cosplay. Show all posts

Thursday, 16 July 2015

DIY Boot Covers

DIY boot covers

Recently I've been sewing cosplays for a future event, and realised, "Hey, if I take photos whilst I make this, I can post a tutorial!" Radical idea, huh? ;)

So after a long (long long long) break, you lovely readers of Unfortunately Oh are getting a new DIY! Thanks to everyone who stuck with the blog (and doubly thanks to everyone who followed me over to Doing A Thing, where I post about books, chocolate, cafes and...doing things!)

Without further ado, here it is: How To Make Boot Covers (or spats. Or even gaiters. I don't know. I'm going to keep calling them 'boot covers').

This is a great method for fancy dress or cosplay, to make existing footwear more appropriate to the costume. Plus, it doesn't damage your boots :) It's especially good if modifying cheap footwear isn't an option due to your shoe size or medical conditions that restrict the sorts of footwear you're able to wear.

how to make bootcovers

You'll need:

For the pattern:
  • Your boots/shoes
  • (If applicable) the trousers you'll wear the boots over
  • Cling film (plastic wrap!)
  • Sticky tape or packing tape
  • Marker pen
  • Scissors
  • A friend to help (optional)

For the boot covers:
  • Pattern (see above!)
  • Fabric
  • Zip for each cover*
  • Scissors
  • Matching thread
  • Elastic (approx 1/2" wide)
  • Dressmakers pen/pencil/chalk
  • Dressmaking pins
  • Sewing machine (or a needle for hand-sewing and lots of patience)

* Either open or closed-ended zips, dependent on how long you intend the boot covers to be. In the past I've used open-ended ones the length of the covers, but this time I used shorter ones as I was making over-the-knee covers and didn't think I'd find zips that long!
Edit: Seriously use long zips. Zips that let you unzip the cover entirely, if possible. It makes these so much easier to get on/off!

Note: This is a LONG tutorial, though it's relatively easy to make these. So I've put in headings:
You can click these to skip to the necessary section :)

Saturday, 12 October 2013

Costume Bits! (Tutorial Roundup)

Halloween is lurking ever closer!
Whilst I have no full costume tutorials on this blog, I do have a few posts on 'costume bits': those little accessories that finish off a costume.

Here's a quick roundup of the pieces you'll find at Unfortunately Oh!


Hope you find something here to help or inspire you with your Halloween preparations! :D

Saturday, 28 September 2013

Elasticated Jabot


Previously I shared a tutorial for a jabot with neckband. Today’s tutorial is for a simple elastic-neck jabot, perfect for wearing with a collared shirt! Mine is messy-looking because I didn't hem ;)


You can also make this without the elastic, and attach the jabot with pins (I’ve done this before too, due to laziness!)

Once again this is easy to make and can be put together using a small off-cut of fabric.

You’ll need:
Fabric
Elastic
Thread

Note: Thin cotton works best for this. The fabric I used in this tutorial has the black stripes printed onto it so it wasn’t completely ideal.

Saturday, 21 September 2013

Jabot with Neck Band


With Halloween at the end of October, I’m sure some of you are already thinking of spooky décor and fancy dress costumes (whether that’s for yourself or someone else!)


Today I’d like to share this tutorial for a jabot, or ‘frilly neck thingy’, attached to a simple neck band. The fastening is a press stud.

I'll be posting other jabot variations in future, so if this isn't quite for you, come back again :)

I figured this out by trial and error when I made the one in the picture (hence why the top frill is slightly wonky).

Thursday, 27 September 2012

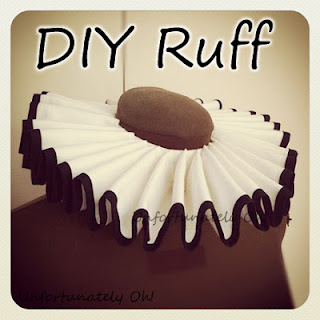
DIY Ruff


Ruffs are one of those iconic pieces that have carried through the ages - seen on nobles of the mid-sixteenth century, jesters, pierrot, clowns, and even the catwalks of today.

It’s easy enough to cobble together a quick elastic-and-fabric ruff, but if you’re looking for something that ‘stands up’, it’s necessary to take a little more time over the construction. 

 
These ruffs were all made for ‘cosplay’, therefore the designs are not mine, but having made them I can appreciate how much work went into the originals! (If you’re wondering, I reproduced costumes worn by Kozi, guitarist of Japanese band Malice Mizer).


Ever since making them, I’ve had a few people ask how to put them together! The first ruff I made (black and gold, above) was constructed based loosely on some instructions I found on the internet. Unfortunately the web site with these instructions has gone to the internet graveyard, so I’ve never been able to share links with people.

As a result, I thought I’d put together this tutorial!

I haven’t made a ruff from scratch for this, so some of the photographs are from the ruffs above. I used some off-cuts and fabric scraps to create process shots, so it should all be clear.
I’m not gonna lie. This will take you a LONG time.

So to find out how to make a ruff, read on!
It’s quite lengthy, so go and make a cup of tea first :)
 

Saturday, 4 December 2010

Eye Patch Tutorial #2: Scissors & Glue Version--Pirate Style!


Another repost, from 'Eye Patch Tutorial #2: Ghetto Scissors-and-Glue version--pirate style!'
Apologies for lack of photos; hopefully diagrams will suffice!

(Looking to make a Gothic Lolita-style square eyepatch? Try this!)

Not everyone has the skill, motivation or time to screw around with a needle and thread, and there is more than one way to make an eye patch!
This is a quick, basic tutorial on how to make a more pirate-style eye patch.

You’ll need:
Fabric
Card
Stapler
Scissors
All-purpose glue
Ribbon/similar to tie your eye patch on

You might need:
Any embellishments you want
A glue gun


Note:
Remember you’ll be wearing this against your eye. If making an eye patch from fabric like velvet or fake fur, you might want to consider a cotton backing (just imagine the fibres getting in your eye--ouch!)

Eye Patch Tutorial #1: Square & Sewn

A repost from 'Eye Patch Tutorial #1: Sewn Version'
Unfortunately I don't have any photographs of the making process; instead there are diagrams drawn for the original tutorial.

(Looking for something more piratey? Check out my pirate-style eye patch tutorial!)

Eye patches are a fun way to change your look, whether it's for a party, a photoshoot, or just for the hell of it. However, it's difficult to get hold of anything beyond the standard black plastic pirate eye patch found in fancy dress shops.
Here's an easy tutorial on how to make your own.

You’ll need:
Scrap card
Fabric
Ribbon or elastic

You might also need:
Interfacing (light-medium weight; for thinner fabrics)
Any embellishments you want to add (lace, trims, roses, etc)


Note:
Remember you’ll be wearing this against your eye. If making an eye patch from fabric like velvet or fake fur, you might want to consider a cotton backing (just imagine the fibres getting in your eye--ouch!)
Related Posts Plugin for WordPress, Blogger...