Showing posts with label child-friendly. Show all posts

Saturday, 13 April 2013

Cute Stuff


A while ago, my lovely friend Lilia of Horror Shock Lolipop sent me this fabulous book!

Cute Stuff by Japanese company Aranzi Aronzo is filled with easy how-tos for cute items that have a purpose!


There are patterns in the book that you can either trace or enlarge on a photocopier; helpfully the book tells you what percentage enlargement you need!

When I first looked through this book I wanted to make everything. Then I became sensible again and realised that I don't need three more cloth bags ;) 

Thursday, 17 May 2012

Higgledy-Piggledy Bracelets


Do you ever have days when you want to make something, but don't want to put in hours of time and effort to do it?

I had one of those days, and put together a few of these easy 'higgledy-piggledy' bead bracelets. (Called so because I threaded beads on at random!)

This is a great little stash-busting project, but also a child-friendly craft project!


Here is a bracelet I made when I was around 7 years old. In this how-to, I explain an alternative way of making a closure to finish off the bracelets!


It is so simple to make these bracelets that it barely needs explaining, but here's a quick tutorial.

Thursday, 29 March 2012

Bad Egg cosy

Today has been lovely and spring-like, with clear blue skies and lots of sunshine!

Of course, along with spring comes Easter, and to me that means eggs. For once I’m not thinking of chocolate (okay, maybe I am a little) but delicious soft-boiled, free range goodness!

Deciding to make an egg cosy, I went to my scraps box to find I didn’t have anything particularly ‘Eastery’. But never mind—I like to do things differently :)


So I made a ‘Bad Egg Cosy’ and a ‘Devilled Egg Cosy’!

Want to make your own? Read on!

Thursday, 22 March 2012

Free Easter Egg Hunt Sign Printable

Easter is just around the corner, and as with last year, I've created an Easter egg hunt printable!

free easter egg hunt signs printable

To download this free printable, simply right-click on the image above and choose 'save link as' (or 'save target as'), or open in a new window to print straight from your browser.

Print onto card, cut out and tape/glue to lolly sticks or similar. Then let your little ones go on a hunt!

Sign prints out at standard A4 size.


Will be linking up at the fab parties at the bottom of the page!

Monday, 12 March 2012

Covered Bracelet

Since I'm going through a bit of a craft drought again (blame poor health and lack of money for crafting materials!) I thought I'd keep this blog alive by sharing a simple craft!

There are covered bracelets aplenty in blogland and I found them inspiring, so when I found a pair of plain bracelets in Poundland I snapped them right up!

covered bracelet

These are only cheap-looking plastic bracelets; Poundland had them in several colours but I chose trusty old black. :)

What I used:
Bracelet
Lace trim
Ribbon (from inside a top--those loops sewn in for hanging wider-necked jumpers, etc)
Flower trim
Glue

This isn't a real tutorial since there are already so many out there, and covering bracelets is pretty obvious anyway.
However, not wanting to cut a length of lace trim - in case I cut too much or too little - and finding it got tangled as I tried to wind it onto the bracelet, I realised I could do this:


I spent a minute or so winding the lace trim onto an empty cotton reel. After that it was easy to wind it off of the reel and onto the bracelet.
I secured the end of the lace onto the bracelet with glue, and once the bracelet was covered, stuck that down as well. After that I wound on the ribbon (again sticking down the ends with glue, on the inside of the bracelet) and finally glued on the flower trim.


I only covered one bracelet, so this project cost me 50p, plus random bits and pieces from my stash (mostly leftovers!)
Somewhen I may cover the second of the pair, but that will look different!

Thursday, 7 July 2011

Tutorial: Old sock pincushion

If there’s one thing I have lots of, it’s socks. Ankle socks, knee socks, over-the-knee socks, stripy, spotty, heart-print, cute characters--I like them all!

The only problem with socks, like other items of clothing, is that they wear out. And there’s only so much patching and sewing that can be done before a sock is no longer wearable.

Usually, once a sock is too worn out to wear anymore, I’ll either put it in textile recycling or I’ll keep hold of it and use it for stuffing small projects.
But sometimes the print is too cute to stuff into a lavender-scented heart, so I tried to find another project to use up an old sock, and came up with this pincushion:

I only bought these socks at Halloween, so was disappointed they wore out so fast!

This was so simple to make that anyone can do it, and makes use of a whole pair of socks.
So grab your holey old (clean!) socks, wield your scissors, and check out this quick tutorial!


Time needed: 5-10 minutes (approx)  

You’ll need:
Old socks
Scissors
Needle and thread
Sewing machine (optional!)


1. Cut off the foot of the sock just above the heel and also the band at the top of the sock. Put these two pieces aside.


2. Turn the centre section inside out and sew up both ends, leaving a gap of a few centimetres at one end in order to turn the cushion back the right way.


3. Trim off the trailing threads and turn back the right way. Use the remaining sock pieces and other sock of the pair to stuff the cushion.


4. Sew up the gap by hand, and you’re done!

 
When I first came up with this, I wasn’t completely sure whether it would work, but it turns out that old sock is a great base for a pincushion! The pins slide in and pull out easily, without snagging or falling out. Success!

Come back again to see the other pincushions I made recently--because yes, a girl really does need more than one!

Monday, 28 March 2011

Tutorial: Painted Glass

customised glass
Customised glass is a unique and original gift for a friend or family member; it’s also great to add a more personal touch to your home!

Read on to find out how to paint glass yourself to create your very own, one-of-a-kind customised wine glass! This project would be great for Mother's Day.


glass painting

Time needed: 45 minutes (dependent on design; excludes drying times)

You’ll need:
A glass
Contour paste
Glass paints
Paintbrushes
Paper and pen/pencil
Kitchen towel
Water
Newspaper

Note: Contour paste and glass paint can be a little fiddly at first--if you can, try to practice on a spare piece of glass (e.g. empty jar)

 
1. Wash and dry your glass and put down newspaper to protect your work surface.

2. Cut a piece of paper that fits inside your glass and draw out your design. I chose a simple flower design. Try not to put in too much detail, since it will be harder to define with the contour paste. 


3. Slip the paper inside the glass, design facing outwards. Use contour paste to trace over the pattern onto the glass. Leave to dry thoroughly. 


4. Paint in your design with glass paint and allow to dry. (Use kitchen towel to wipe excess paint from your brush and rinse in water in between colours; try to start with the lightest colour!)


5. Pick out any other details you might wish to add. This glass has a nice stem reminiscent of a Roman column, so I decided to pick it out with a vibrant green.
Leave overnight to ensure the paint is entirely dry.


Glass care: Wash with warm soapy water. Do not put in the dishwasher!

Cleaning your brushes: Glass paint can be difficult to wash off brushes--water doesn’t have much of an effect! I cleaned off mine by washing them in brush cleaner to remove the paint, then in warm soapy water to remove the brush cleaner. A small amount of conditioner smoothed through the bristles helps to keep the brush in good condition.

Monday, 7 February 2011

Tutorial: Beaded Hanging Heart


Pin It


The third instalment of my hanging heart tutorials!

This one is much quicker to make and requires very little skill, so if you lack confidence with a needle and thread, this is the tutorial for you! 
Read on to find out how to make a simple hanging heart with beads.


Time needed: 5-10 mins

You’ll need:
Jewellery wire
Assortment of beads
Ribbon, leather cord or similar
Side cutters
Round-nose pliers


1. Cut a length of wire and fashion loosely into a heart shape, leaving a few centimetres extra at either end. Don’t bend the wire too sharply else threading beads might be difficult!


2. Thread beads onto the wire. I chose to use a selection of natural-coloured wooden beads and a larger, contrasting red bead.


3. Wind the two ends of wire together and bend with round-nose pliers to make a loop.


4. Cut a length of leather cord or ribbon and tie onto the metal loop.


5. Bend the wire a little more as necessary to better define the heart shape.

Sunday, 6 February 2011

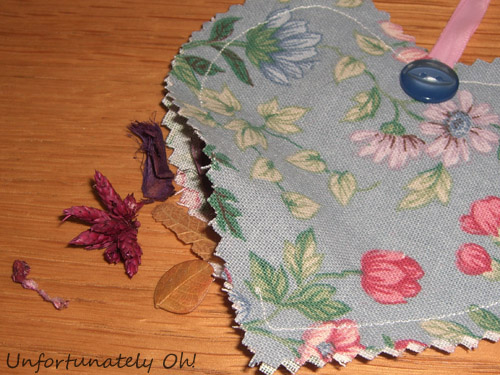
Tutorial: Scented Hanging Heart


Here’s the second of my hanging heart tutorials. This one is pretty similar in method to the fabric heart tutorial, but produces a different looking result.


Time needed: 20-30 mins

You’ll need:
Fabric
Thin ribbon
Button
Dried lavender or pot pourri
Needle and thread
Pinking shears
Heart template
Toy stuffing (optional)
Sewing machine (optional)


1. Draw and cut out two hearts with pinking shears. Place together, right side facing outwards.


2. Cut a piece of ribbon, fold in half and tuck the end between the two sides of the heart, top centre. Pin in place.


3. Sew around the edge, leaving a seam of approximately 0.8cm. Leave a gap for filling the heart!


4. Sew a button onto the heart, below the ribbon.


5. Fill with lavender or pot pourri. You could either fill the heart entirely with a scented filling, or just add a small amount and fill the rest with toy stuffing. (I added some stuffing to mine, since the pot pourri I have isn’t great for this project.)


6. Sew up the opening and you’re done!

Monday, 31 January 2011

Tutorial: Button Badge Heart Picture

Button Badge Heart Picture by Brigitte Herod
£175 at Rockett St George
(Also check out the Scrabble LOVE YOU Picture, £59)

 Much as I love Brigitte Herrod’s ingenious ‘Button Badge Heart Picture’, I’m far from able to afford the £175 price tag.

So I got out my huge collection of badges and worked out how to make my own for free!
 
 My version; cost: free
Pin It

Here’s an easy-to-follow tutorial for how to make a button badge heart picture of your very own.
You can either make a temporary version or a permanent version, depending on whether or not you want to reuse the badges!


Time needed: 1-2 hours

You’ll need:
Large selection of badges (try ebay for job lots)
Paper/card/board for background
Pencil
Blu-tack (for temporary version)
Glue gun (for permanent version)
Frame (optional)


 1. Lightly draw a heart shape onto your background (I used a page from an A3 canvas paper pad). It doesn’t have to be perfect because you’ll adjust the shape as you go. 


2. Decide how you want to set out your badges. Start by setting some around the edge of the heart and then fill up the space inside. 


3. Stick the badges to the background. If using blu-tack, use a decent-sized piece on the pin of each badge. In cases where the badges overlap, stick a bit of blu-tack to the underside rim and affix the badge to the badge(s) it overlaps with. Work in a similar fashion if using a glue gun.


4. Once you’re finished, check all badges are attached securely and frame or display as wished.


Suggestions:
  • If making this as a gift, include badges that are personal or hold special memories--a favourite animal, cartoon character or beverage, badges from trips out, etc.
  • Experiment with colour and patterns. This could be the background or the badges e.g. outline the heart with all red badges and fill the inside with black and white badges, or glue old newspaper to some board to great a more interesting background.
  • If you don’t have enough badges, why not try something else? Buttons, bottle caps, even jam jar lids could make a stunning alternative.

Related Posts Plugin for WordPress, Blogger...