
A couple of weeks ago, my middle sister showed me a gorgeous bracelet from Swarovski Elements. It was like an elaborate friendship bracelet, with the traditional woven strap, and the addition of diamante, chain, and coloured lacing. My sister loved it, I loved it...but it was £176. Ouch.
I realised I could use it as inspiration to make my own version.
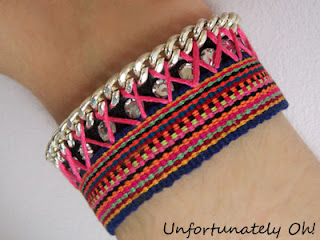
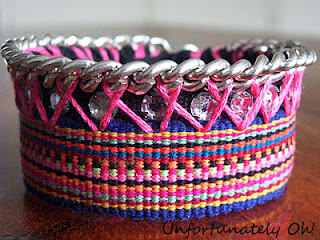
So here’s mine:

My version, cost £0
And here is the original:

Joyful Bracelet by Bibi Bijoux for Swarovski Elements, RRP £176
Isn’t it beautiful? You can buy it at the Swarovski Elements Web Shop
I made my bracelet with things I had to hand, so it was essentially free. Production was pretty time-consuming, but I’m pleased with the result!
Read on for a tutorial!

Time needed: An afternoon
You’ll need:
Friendship bracelet or decorative trim
Rhinestones or rhinestone trim
Rhinestones or rhinestone trim
Stiff webbing or similar (width = width of friendship bracelet + width of rhinestones + 0.5cm)
Chain
Embroidery thread
Extra strong thread (I think what I used was carpet thread!)
Press stud kit
Glue

1. If your bracelet has ties, chop them off! If you’re using trim instead, cut a piece around 1.5cm-2cm smaller than the measurement of your wrist (longer if you want a looser bracelet).

2. Cut a piece of webbing to fit around your wrist, with overlap for fastening. As in step 1, if you want a looser bracelet, cut a longer piece of webbing. You might need to seal the edge of your webbing to keep it from fraying.
The stuff I used came from the charity shop, so I’m not completely sure what it is--just that it looked useful and came as a big real for only £1!
The stuff I used came from the charity shop, so I’m not completely sure what it is--just that it looked useful and came as a big real for only £1!
Cut a piece of chain just shorter than the webbing.

3. Sew the chain to one edge of the webbing, starting at one end. (This will be the end on top of the overlap, once your bracelet is finished.)

4. Fix your rhinestones beneath the chain, spacing them around 0.5cm apart, but not on the overlapping ends of webbing.
I used loose rhinestones as I had them to hand, but rhinestone trim would be less time consuming and easier to attach evenly!

5. Glue the friendship bracelet onto the webbing, underneath the line of rhinestones, and leave to dry.
This is where you can see my webbing wasn't quite wide enough!
This is where you can see my webbing wasn't quite wide enough!

6. Cut a length of embroidery thread and split it into two lengths of three threads each. Thread one length into a needle so that you can sew it with double thickness.
I tried not splitting the thread at first and using a darning needle (the only thing I had that I could thread full width embroidery floss onto!). However, the needle wasn’t sharp enough to go through the bracelet.

7. Embellish the bracelet with diagonal stitches. These stitches should go from beneath the centre of each rhinestone (on the friendship bracelet/trim) and through the link of chain above the next rhinestone along.

8. Once you’ve reached the end of the length of rhinestones, sew diagonal stitches in the opposite direction.

9. For a bit of extra detail, sew a few stitches along the ends of the friendship bracelet or trim.

10. To finish, attach press studs to the overlapping ends.
Enjoy your bracelet! I hope these instructions were clear enough; I spent a few hours muddling my way through to work out the best method :)
I am totally in love with my new bracelet! My sister is too...maybe I should make her one!


Enjoy your bracelet! I hope these instructions were clear enough; I spent a few hours muddling my way through to work out the best method :)

I am totally in love with my new bracelet! My sister is too...maybe I should make her one!


Will be linking up at the parties below!
I can't believe you made an almost exact replica of the bracelet your sister loves and you didn't make it for her?! HA!
ReplyDeletep.s. good job! holla!
Wow, that is extraordinarily impressive. Really. How in the world did you figure out how to do it. I'm so thrilled that you shared at our party this week. (and so happy you're back on the creativity wagon, lol).
ReplyDeleteAMAZING!!
ReplyDeleteoh you are so clever! Well done!
ReplyDeleteWOW! This is amazing!!!! Thank you so much for the tutorial. Like you, I have everything on hand so I can't wait to make one.
ReplyDeleteWow - I like your price much better - way to go!! Saw you on TT&J
ReplyDeleteVery elaborate and beautiful! You are very talented to see the original and come up with your own version. Saw this on TT&J. Very impressive.
ReplyDeleteHi! Visiting from tt&j. Wow.. I love your bracelet! It looks like the original but I like yours better! Homemade is always better :)
ReplyDeleteIm going to poke around your site a little more. I would love for you to share this at my Friday link party!
Indeed, very beautiful and you have such talent for such work besides your interior design work.
ReplyDeleteHope this finds you in good health as well as Lulu.
Looks totally like the original... great job.
ReplyDeleteBrilliant job! And your version is cuter than the original :)
ReplyDeleteLOVE THIS!!! Looks just like the original. Great job and thanks for the great tutorial. :)
ReplyDeleteI love this! It looks so great. You did a great job on it.
ReplyDeletewow, that is beyond impressive to make a replicate of that bracelet. I think your version is prettier. Your very talented, and creative. The tutorial is very good too. Thanks for sharing your creative inspiration at Sunday's Best.
ReplyDeleteBeautiful!
ReplyDeleteKathy
beautiful idea! thanks for sharing your tutorial!
ReplyDeleteMuch love,
The Creative muslimah @ www.thecreativemuslimah.blogspot.com
Wow I love this! You did an awesome job - it's so cute :)
ReplyDeleteWhat a great take on the original.
ReplyDeleteI hope you can stop by and share at the It’s a Wrap Link Party at Artful Rising.
Erika
Great DIY! I've been contemplating making a bracelet since I made a fun head wrap with beads and embroidery thread. I think I'll give it a go! xo
ReplyDeleteWow! So beautiful and beautifully creative! Very impressed.
ReplyDeleteWow! Looks very close to the inspiration. Great project! Thanks so much for sharing at Etcetorize~
ReplyDeletethat is just beautiful! and i love love love the colors!
ReplyDeleteThis is beautiful, what a great match it is to the original!
ReplyDeleteJust to let you know I featured your beautiful project on homework today. Come over and grab a featured button if you’d like. Have a great weekend.
ReplyDeleteYour bracelet looks even better! I love it and your colors are beau.ti.ful!
ReplyDeleteKei (I wonder how you pronounce your name...my granddaughter's name is Kai, pronounced with a long i - rhymes with high). You must stop over. Somebody's been featured!
ReplyDeleteYou were our most visited link this week at Tute Tuesdays! Congrats and thanks for linking up! Love the bracelete!
ReplyDeletehttp://threeyearsofdeath.blogspot.com/2012/03/tute-tuesday-link-up-7.html
WOW!!! For several weeks I have been thinking of attempting to make the bracelet but now you've done the hard part for me. Nice work!
ReplyDeleteThis is so cute! I love copycat projects.
ReplyDeleteI would love for you to follow my blog too so that we can share ideas!
Your newest follower,
Val @ http://cookcraftcrocheting.blogspot.com/
Love this! I was considering creating something similar, but made in a different way... shall let you know if I manage it!
ReplyDelete