
With Halloween approaching, I’ve been thinking of what Halloween-themed crafts I could post here. There are countless crafts I’ve already seen online - spooky wreaths, pumpkins, banners and décor - but I wanted to do something a little different!
Since Halloween isn’t as big here in the UK as it is in America, we don’t decorate all that much. Usually I’ll carve a pumpkin and decorate the steps and front door in case the neighbour brings her two children around for some trick or treating, but that’s it.
So here’s a little Halloween craft I want to share with you: pumpkin carving stencils!
These are my pumpkins from last year. They took me eight hours to hollow out and carve (whilst making a huge vat of pumpkin soup!)

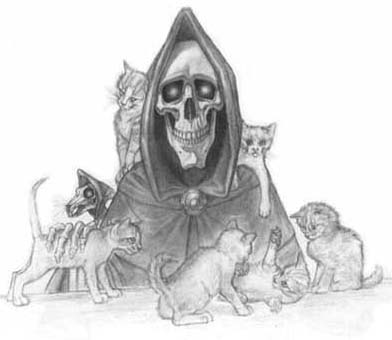
This one is Death from Terry Pratchett’s Discworld series; the original artwork is by Paul Kidby. I edited out Death of Rats when I made a stencil because there was too much detail to carve.

As for this second pumpkin, the broken-down building at the front is from a photo I took of Glastonbury Abbey; the image of Bela Lugosi on the back was one I found on Google image search, so I don’t have a proper credit, sorry.
I made the stencils using Photoshop Elements. At the time I didn’t have a blog, so I didn’t think to document the process!
So I did it again quickly with one picture to show you guys.
Here’s a tutorial!

You’ll need:
A picture (make sure it’s a decent size)
Photoshop or similar image-editing software
Patience and a steady hand!

1. Open your picture in Photoshop (or similar) and whack up the contrast. In my version of Photoshop Elements, it’s hiding under Enhance > Adjust Lighting > Brightness/Contrast…

2. Convert the image to Grayscale by going to Image > Mode > Grayscale. You’ll be asked if you want to discard colour information (click OK)

3. Turn up the contrast again. You might not need to turn it up as high as I did here; if you start to lose detail you want to keep then turn the contrast down a little.

4. Erase the background using the lasso and/or eraser tool. Use the brush tool to pick out details you want to keep and paint out bits of the image that are too detailed to carve:
Black = shadow
Grey = midtone
White = highlight
In the case of this picture, I picked out some of the shadow on the remains of the carving on the right, and around the doorway. I got rid of the detail around the doorway and behind all the arches. At this point, I used the eraser tool to delete the space behind the windows and doorway, as it will print out as white anyway!

5. Turn down the brightness of the image if necessary. The shade of grey I used ended up a little light for my taste, which is why I put this step in. Then resize your image by going to Image > Resize > Image Size... and adjusting the document size to suit your pumpkin.
Print it out and you’re all ready to carve!
Carving tips:
- Tape the stencil to your pumpkin using masking tape, and go over the lines with a pin to transfer onto the skin of the pumpkin.
- Keep the stencil next to you for reference!
- Use a scalpel or small craft knife for the details; leave the kitchen knife for when you need to cut out large, thick pieces of pumpkin (e.g. the white parts of the stencil).
- Cut out entirely any white sections (excluding the space around the stencil; e.g. in the image above I cut out the door and windows)
- For the grey sections of the stencil, peel off the skin of the pumpkin with a craft knife.
- The black parts of the stencil can go untouched.
- Carve out as much of the pumpkin as you dare in order to get the spooky, glowing effect on the sections where you peel off the skin.
- If you’re using an stencil like the one I used of Death, cut a hole in the back of the pumpkin or leave off the lid, else the candle will go out (I found this out the hard way).
- Take your time and don’t rush. I actually messed up my Death pumpkin because I got distracted!
- Most importantly have fun!
Patience and a steady hand are tricky for me lol but these pumpkins look incredible!
ReplyDeleteThank you so much for linking up to MYM!
Jamie
For Love of Cupcakes
Wow, you must have an abundance of patience! That pumpkin looks amazing. Thanks for sharing at Etcetorize~
ReplyDeleteVery cool pumpkins. I still do mine with triangle eyes and pointy teeth! Not very creative.
ReplyDeleteThank you for the lovely comment on my purple tee linked to Flamingo Toes. You are my first ever commenter! Made my day.
Karen
This is awesome. I am a huge fan of Terry Pratchett, and you've made my jaw hit my chest with the DEATH pumpkin. Freakin' amazing!!
ReplyDelete