

Ruffs are one of those iconic pieces that have carried through the ages - seen on nobles of the mid-sixteenth century, jesters, pierrot, clowns, and even the catwalks of today.
It’s easy enough to cobble together a quick
elastic-and-fabric ruff, but if you’re looking for something that ‘stands up’,
it’s necessary to take a little more time over the construction.

These ruffs were all made for ‘cosplay’, therefore the
designs are not mine, but having made them I can appreciate how much work went
into the originals! (If you’re wondering, I reproduced costumes worn by Kozi,
guitarist of Japanese band Malice Mizer).

Ever since making them, I’ve had a few people ask how to put
them together! The first ruff I made (black and gold, above) was constructed
based loosely on some instructions I found on the internet. Unfortunately the
web site with these instructions has gone to the internet graveyard, so I’ve
never been able to share links with people.
As a result, I thought I’d put together this tutorial!
I haven’t made a ruff from scratch for this, so some of the
photographs are from the ruffs above. I used some off-cuts and fabric scraps to
create process shots, so it should all be clear.
I’m not gonna lie. This will take you a LONG time.
So to find out how to make a ruff, read on!
It’s quite lengthy, so go and make a cup of tea first :)
You’ll need:
Fabric for ruff base
Fabric(s) for ruffles
Trims (optional)
Press studs for ruff base
Small, clear plastic press studs
Thread to match
Two needles
Dressmaker’s pencil/tailors chalk
Ruler
Your usual assortment of sewing tools!
1. Measure your neck circumference and add 2.5cm for
overlap. Draw out two rectangles onto your base fabric using this measurement;
the depth should be the desired height of your ruff.

2. Cut out the rectangles with seam allowance, pin right
sides together and sew along three edges. Turn back the right way and sew up
the open edge (doesn’t have to be amazingly neat; the base will be hidden by
the ruffles!)

3. Sew press studs onto the ends of the ruff base, so that
it can be closed in a circle. For the white ruff I just used one, but for the
other two ruffs I needed two sets of press studs. Check that it fits your neck
comfortably!

4. To work out how much ruffle fabric you need:
(This isn’t a finely crafted method, but it works for me!)
- Decide how wide you want each ruffle to be (e.g. 1cm)
- Curve a tape measure onto the ruff base where the ruffles will be attached, and take that measurement. (e.g. 19cm)
- Multiply this by your neck measurement taken in step 1. The result is the length of fabric you need for the ruffles.
- For the depth, this will be how deep you want the ruff to be (from your neck to the outside edge) e.g. 15cm
This can end up being
a pretty big measurement. The red and black ruff above took about 10-12 metres
of ruffle!
You don’t need to by a piece of fabric measuring this
length; you can cut shorter strips and sew them together!
5. Draw out a long
rectangle(s) onto your ruffle fabric(s):
- Depth = 2x desired ruff depth, plus 2cm for seam allowance
- Length = either length discerned in step 4, or several shorter pieces that total that length (plus seam allowance!) I usually opt for cutting one or two longer pieces, as I usually find ways to use up the extra fabric!

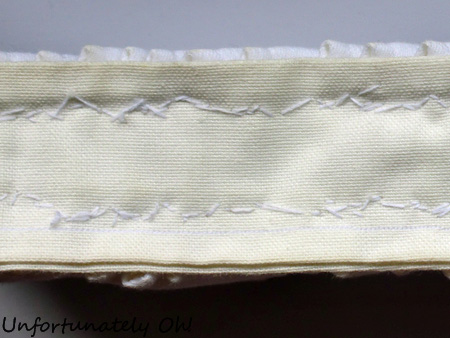
Cut these out, fold in half lengthways (right side in). If
using one fabric on top of the other, fold them together. Then pin and sew
along the long, raw edge.
Turn in the right way and press (I was too lazy for this
with the red fabric, so I sewed along the long edge)

If using vinyl
like in the picture, just cut 1x depth as the raw edges don’t matter!
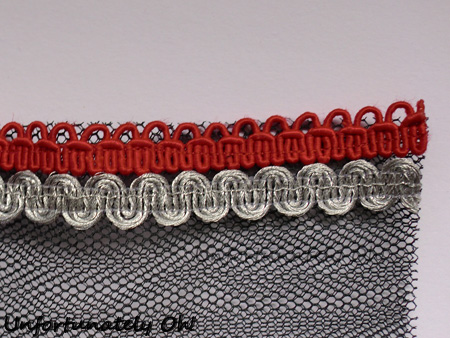
6. Sew on any trims you want to use to the edge of the
fabric.

7. Hem the short ends of the ruffle fabric.

8. Thread two
needles.

9. About 1-1.5cm from the top and bottom of your ruff base,
make a couple of anchor stitches with each needle. It helps to start at the end
with the press studs on the outside.
(I’m using a felt off-cut for this example, rather than a proper base, so no
press studs)

10. Start stitching
the long, inside edge of the ruffle fabric to the base. I usually put 2-3
stitches in depending on the weight of the fabric.

11. Once secure, pull the needle through the back of the
ruff base, 1cm from where you stitched the ruffle fabric on, and make another
anchor stitch.

12. Repeat step 10-11 with the thread at the top of the ruff
base.

13. Fold the ruffle fabric round on itself to make the first
loop/ruffle and stitch to the base as before.
14. Continue until you read the other end of the ruff base.
The back will look pretty messy, as in the picture! (You could glue on a strip
of felt if you don’t want this to show) If you find you have excess fabric,
trim it and hem the end before sewing the final ruffle. Likewise if you find
you don’t have enough, sew an extra piece on before you continue.

15. Sew a few clear plastic press studs to the hemmed ends
of the ruffle fabric so that the ruffles are held together when the ruff is
worn.
16. Heave a huge sigh
of relief, because you’re finally done. Sit back, rub some feeling back
into your fingers, and feel proud of yourself!
Having a little poke around on the internet, I found the
Elizabethan Costume Page, which has lots of information on the Elizabethan ruff
and its construction. So if you’re looking for something more complicated and
historically accurate, check it out!
Wow - you must be a brilliant costume maker. Such detail in a relatively small thing.
ReplyDeleteSarah
http://acatlikecuriosity.blogspot.co.uk
Wow, this is really cool, are you a costume designer. I don't think i ever seen any one make this - and can't imagine anyone doing it better. Nice tutorial! Thanks for sharing your inspiration with Sunday’s Best – you helped make the party a success!
ReplyDeleteThank you so much! I'm going to try a doll sized one of these, so this is very helpful.
ReplyDeleteTry plugging your old, defunct links into the wayback machine (www.archive.org). There is a very good chance that they have no been archived there. Cheers! (Elf)
ReplyDeleteThanks for the suggestion; I have tried it for that link but it's one of the few that wasn't archived! Baaah!
Delete