After resolving only to craft using items already in my
stash (and gaining some great suggestions!) I came up with this feather cuff,
which used a bunch of leftover bits and pieces.
It would also make a cute Native American Indian-inspired
headdress for a toy! ;)
This is a teen-friendly craft, though could also be suited
to children (with an adult to help with the press studs!) if the chain is
omitted.
Of course, this post wouldn’t be complete without a
tutorial, so here’s how to make a feather cuff!
Please bear in mind that I just used what I had--this would
look just as neat with different colours! This was very much a trial-and-error
craft for me, so along the way you’ll see notes about where I messed things up!
You’ll need:
Fabric(s) for cuff base*
Feathers
Trim 1 - approx 10-15mm wide
Trim 2 - approx 10-15mm wide
Chain
Press stud kit (you may need a small hammer in addition to
this)
Multipurpose or fabric glue
Needle & thread to match trim
Fray stopper (optional)**
Scissors
Wire cutters (for chain)
Ruler
Pencil for marking
* I used two fabrics: Leather-look PVC for the top, and
denim for the lining (because PVC makes the skin sweat!)
** Only use fray stopper if you’re using fabric that frays,
or just used glue. I don’t have any fray stopper, so I went for the glue :)
1. Cut out the cuff base from your fabric(s):
Measure your wrist and add 4-5cm to that measurement as overlap. This is the length of your cuff.
To work out the width of the cuff, add together the widths of trim 1 + trim 2, then add approximately 2.5 cm.
Measure your wrist and add 4-5cm to that measurement as overlap. This is the length of your cuff.
To work out the width of the cuff, add together the widths of trim 1 + trim 2, then add approximately 2.5 cm.
So if trim 1 was
1.5cm, and trim 2 was 1cm wide,
1.5 + 2 + 2.5 = 6
1.5 + 2 + 2.5 = 6
The fabric I cut was
18.5cm x 6 cm (I messed up and didn’t account for a big enough overlap)
2. If needed, put some fray stopper or glue around the edge
of your cuff lining and set aside to dry.
3. Spread glue along the bottom section of the top piece of
fabric (right side up) and stick on a length of trim 1. Do the same directly
next to this piece for trim 2.
For the top piece of
fabric, I used leather-look PVC: it doesn’t fray, matched the feathers, and
won’t look bad showing through the feathers or gaps in the trim!
4. Glue the rest of the piece of fabric and stick on the
feathers.
I used pretty raggedy
feathers! They were the last of a pack I bought from Hobbycraft a few years ago
for a different project. Ideally I’d have used nicer feathers, and more
feathers than shown here.
5. Apply glue sparingly
to a piece of trim 1 the length of the cuff, and stick this over the ends of
the feathers, above trim 2.
I really do emphasise
the sparingly here! I put on a little too much glue and when I pressed the trim
down it squished out onto some of the trim. Argh!
If you’re as messy as me you’ll want to wash your hands at
this point!
6. Use wire cutters to cut two pieces of chain the same
length as the cuff.
7. Sew the chain onto the outer edge of the cuff, and to the
edge of the trim that covers the feathers.
8. If you’re using a separate base/lining fabric for your
cuff, spread glue across it and stick it to the decorated fabric. Use a small
amount of glue or fray stopper on the ends of the trims, if needed.
9. Apply press studs according to the instructions on the packet.
Make sure the cuff fits your wrist comfortably and that the press studs are
tightly fixed!
In this picture you
can see where I used too much glue on the trim over the feathers; it seeped out
onto the trim underneath. Luckily this is at the end of the bracelet!
10. That’s it--you're done!
Obviously this little project allows for a lot of
variation--why not make a lace-up cuff instead of press studs, make it wider or
narrower, or use some lace in place of feathers?
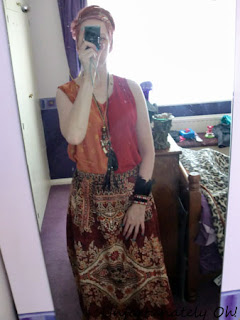
Here’s how I like to style mine up:
I paired it with a remade skirt and headband, plus an old tunic top and some necklaces :)
Will be linking up to the fabulous link parties listed
below!


Love your entire outfit and especially the edginess to this cuff.
ReplyDeleteI think you should get a bag and sew on/glue/attach as many of your stash items as possible....that would ROCK! :D xx
ReplyDeleteI also love your outfit, and what a pretty cuff! Love the feathers, and you could really change this up however you wanted! So glad you shared your creative inspiration with Sunday’s Best – your creativity helped make the party a success!
ReplyDeleteVery fun cuff! Just wanted to stop by and say thanks for coming over to Posed Perfection and for leaving me the sweet note about the Simple Burlap Candle Holder. I hope you'll come back for a visit and click on my "Follow Me" button to add Posed Perfection to your GFC. Have a blessed week! ~ Nici
ReplyDeleteWhat a great stash buster! I love how you put all of the different odds and ends together. Thanks for sharing at Etcetorize this week!
ReplyDelete