My big projects are done!
Now that I’ve got more time to craft and blog about it, I’m
hoping to update here more often.
Today I’d like to share a tutorial for these beaded tassel
earrings. They were inspired by some I saw in a shop a while ago; unfortunately
I couldn’t pin them so I can’t share a pic of the inspiration!
This is a good craft for someone who is more confident in
making jewellery; however this tutorial does briefly cover some of the basic
jewellery-making techniques needed.
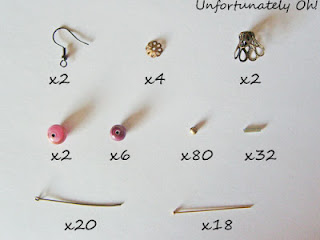
You’ll need:
2 x earring hooks
2 x large bell-shaped bead caps with 8 loops/holes around
the edge (10mm)
4 x smaller ‘flower’ bead caps to fit largest beads (9mm)
2 x large beads (9mm)
6 x medium-sized beads (to fit into large bead cap) (7mm)
80 x small spacer beads (3mm)
32 x small tube beads (9mm)
20 x eye pins (45mm)
18 x head pins (40mm)
Tools:
Flat nosed pliers
Round nosed pliers
Wire cutters
Note:
Sizes in italics are the approximate sizes I used for this
project. I didn’t buy anything new for this--simply used what was in my stash!
 |
| Click to enlarge |
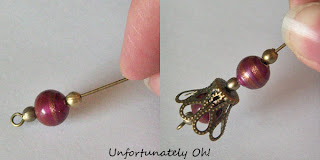
1. Thread an eye pin in the following pattern of beads:
spacer - medium-sized
bead - spacer
Add a bell-shaped bead cap over the top and repeat the bead
pattern above the bead cap.
 |
| Click to enlarge |
2. Make a loop at the top of the eye pin and add to earring
hook:
a) Use flat nosed pliers to bend the remaining wire at a 90 degree angle
b) Use round nosed pliers to curl the wire around into a loop and cut off excess with wire cutters.
c) Open loop of earring hook sideways using flat nosed pliers and slide on the top loop of the eye pin. Close again using the flat nosed pliers
 |
| Click to enlarge |
3. Thread another eye pin with beads and bead caps in the
following pattern:
spacer bead -
‘flower’ bead cap - large bead - ‘flower’ bead cap – spacer bead.
Close the top with a loop using the same method explained in
step 2.
 |
| Click to enlarge |
4. Connect to the bottom of the earring so far.
Thread a head pin with beads in the following pattern:
Thread a head pin with beads in the following pattern:
spacer bead -
medium-sized bead - spacer bead
Close the top with a loop as before, and attach to the
bottom of the eye pin added in step 3.
 |
| Click to enlarge |
5. For each earring, thread 8 eye pins and 8 head pins with
beads in the following pattern:
spacer - tube -
spacer
Close the tops of the head pins and eye pins using the
method explained in step 2.
 |
| Click to enlarge |
6. Join one threaded head pin and one threaded eye pin, and
attach to one of the loops/holes at the edge of the bell-shaped bead cap.
 |
| Click to enlarge |
7. Repeat for each hole/loop.
 |
| Click to enlarge |
8. Once you’re done, your earrings should look something
like this!
Will be linking up at the parties at the bottom of the page!


Wow, these are beautiful! Thanks for posting, I pinned these to make at a later date.
ReplyDeleteThese are really nice! I think I have something similar to those bell shaped bead caps in my jewelry findings stash. I need to look! Thanks for the inspiration.
ReplyDeleteWow, those are very cool! I haven't made jewelry in a while :-(
ReplyDeleteYour Creation is Beautiful! I Love Exotic Style Jewelry.
ReplyDeleteThanks for stopping by my Blog for a visit and to behold our Awesome Curbside 'scores'! *Winks*
Blessings from the Arizona Desert... Dawn... The Bohemian
Love these much! Thanks for sharing!
ReplyDeleteLove these much! Thanks for sharing!
ReplyDeleteAwesome designs!!
ReplyDeleteExplore much talked designer earrings.