Remember this zip clutch? It was my submission for the Naughty Notions Challenge, run by Keren and Rikka! (The challenge they most recently hosted was the Typography Challenge. Read about my entry here and vote for your favourite here)
As I wrote before, the clutch gave me a bit of a headache and there was some trial and error involved in its production. But it was worth it--the clutch looks fab and I won silver! (Check out the other winners here)
Anyway, I finally got around to writing a tutorial for this bag. Pictures are somewhat limited this time (sorry!) as I forgot to take them.
...Okay, I’ll confess: I didn’t write a complete tutorial. I skipped the first part. Mainly because the hinge frame bag tutorial over at Bag’n-telle explains it perfectly—so check it out first for how to draft a pattern best suited to your hinge frame and your needs. (Then come back here…you will, won’t you?!)
You’ll need:
Pattern
Lots of zips
Outer shell fabric
Interior fabric
Bias binding (to match or contrast with interior fabric)
Chains
Jump rings
Cottons to match your zips
Hinge frame
Strong glue (I used E6000)
Tools:
Ruler, set square etc for drafting pattern
Tailor’s pencil/dressmaking chalk
Scissors
Wire cutters
Sewing machine with zipper foot
Needle
Flat nose pliers
Something with a rounded point (I used flat-nose pliers)
1. Cut out your outer shell fabric and your interior fabric. Contrary to the tutorial linked above, I cut each as one piece. I used an off-cut of denim for the outer shell and part of an old pillowcase for the interior.
Originally I was going to line the interior fabric, but I got partway through construction and realised it wasn’t going to work – and was unnecessary - so had a lot of unpicking to do!
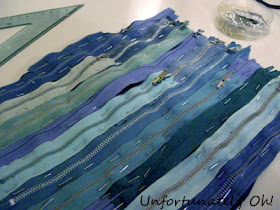
2. Pin your zips to the right side of the outer fabric and sew on using the zipper foot of your sewing machine. I sewed four lines down each zip: either side of the teeth, and each edge.
Tip: Try to lay these out so that none of the zipper teeth are near the sides of the bag! It makes later stages much easier and neater.
3. For the inner pocket, cut a piece of inner fabric the desired width x twice the desired depth (to sew it double) and add seam allowance. Fold the pocket piece in half, right side in, and sew up the sides.
4. Turn pocket piece the right way around and press. Sew a piece of bias binding along the raw edge. Pin to the lining fabric and sew the sides and bottom.
5. Fold the interior fabric right sides in along what will be the bottom of the clutch, and stitch up the sides.
(please ignore the fact I have stiff lining there...I messed up and took it out, but forgot to take another picture!)
6. Trim off any zipper teeth that overlap the seam allowance/where you will stitch, plus extra the same depth as your hinge frame (use wire cutters to cut through the teeth, if necessary) I broke needles accidentally sewing through teeth...eek!
7. Fold the exterior of the clutch, right sides in, and sew up the sides.
8. Pop the exterior inside the interior (right sides together) and pin the edges.
9. Sew together one side of the top of the clutch, and the sides/corners of the opposite side. Turn the fabric the right way around and sew up the remaining seam by hand.
10. At this point I realised the seams were too big to fit into my hinge frame, argh! I knew I needed to press the edges but was too lazy to use an iron to flatten them, so I used flat nose pliers instead. I know, it’s really unprofessional! But it worked. If you have the same issue at this point, an iron would probably do the job quicker!
11. Attach the hinge frame: glue sparingly along one of the top edges of the clutch and ease into the frame. You’ll probably need to use something to push the fabric completely inside--I used flat-nose jewellery making pliers for this, as I had them to hand.
Leave it to dry completely or overnight before gluing the other side into the frame.
12. Attach the chains to the zip pulls with jump rings (I did this before adding the frame but the chains got in the way somewhat!)


I remember when you made this bag. I loved it then and I love it now. Thanks for the tutorial
ReplyDeleteI love it!! !
ReplyDeleteThis is just the cutest bag, great tutorial too. Thanks for sharing.
ReplyDeleteha! I am always so lazy when it comes to getting the iron out. I resorted to straighteners once cos they were nearer! :D xx
ReplyDeleteGreat clutch! You were featured this week on the tute tuesday link-up!! Thanks for linking up, and feel free to drop by and link up again this week!
ReplyDeletehttp://threeyearsofdeath.blogspot.com/2012/04/tute-tuesday-link-up-11.html