Monday, 4 January 2016
6 Ways to Repurpose Old Christmas Cards
It's the New Year, and you're probably taking down Christmas decorations, and amassing a huge pile of Christmas cards to go into the recycling.
Maybe you're looking at some of the artwork reluctantly, thinking, "It seems such a waste to just throw these away..."
You're right.
Which is why I've been beavering away to put together this post of 6 Ways to Repurpose Old Christmas Cards.
For the most part, these little crafts are easy--if you can cut and stick, you can do these!
Some of these will also help you save some time next Christmas.
Some are best done now, whilst some are worth leaving until closer to the festive season, when - provided you've dedicatd some time to chopping up old cards this January - you'll have all you need to crack on with some Christmas crafting (without having to fork out for expensive store-bought stuff).
So, starting with the most obvious...
Monday, 21 December 2015
11 Jewellery DIYs to Start Your Year with Style
Christmas and New Year may be looming, with mulled wine and turkey still to go, but it's never too early to plan your crafts for next year.
After all, there's only 10 days left of 2015...
I've dug into the archives for this roundup of past tutorials.
Here are 11 DIYs to start your 2016 with style (or at least a trip to your favourite crafting store!)
Starting with the easiest--if you want more of a challenge, or something more time-consuming scroll to the bottom and check out my Pompom Necklace and Metal Disc Necklace DIYs!
After all, there's only 10 days left of 2015...
I've dug into the archives for this roundup of past tutorials.
Here are 11 DIYs to start your 2016 with style (or at least a trip to your favourite crafting store!)
Starting with the easiest--if you want more of a challenge, or something more time-consuming scroll to the bottom and check out my Pompom Necklace and Metal Disc Necklace DIYs!
Amethyst Collar DIY
Level: Easy
Level: Easy
If you can glue one thing to another thing, this is the craft for you.
Despite being so easy to make, this is a great statement piece!
Thursday, 5 November 2015
In Case of Hoarding, Smash Stash.
Recently, Samantha of At Home With Mrs H began 'The Big November Destashing', in which she encourages us fabric hoarders to destash and - radical idea - use some of that fabric!
Considering the frightening mess that is my scraps collection (above), it sounded like a great idea, so I rolled up my sleeves and set to work!
You wouldn't believe the amount of stuff I had ferreted away!
Labels:
destash
Monday, 2 November 2015
DIY Vintage Buckle Pendants
You could incorporate these into a great gift for any vintage
fan or family history nut--see below for how I used mine!
Labels:
craft,
gift,
jewellery,
teen-friendly,
tutorial,
tween-friendly,
vintage
Thursday, 16 July 2015
DIY Boot Covers
Recently I've been sewing cosplays for a future event, and
realised, "Hey, if I take photos whilst I make this, I can post a
tutorial!" Radical idea, huh? ;)
So after a long (long long long) break, you lovely readers
of Unfortunately Oh are getting a new DIY! Thanks to everyone who stuck with
the blog (and doubly thanks to everyone who followed me over to Doing A Thing,
where I post about books, chocolate, cafes and...doing things!)
Without further ado, here it is: How To Make Boot Covers (or
spats. Or even gaiters. I don't know. I'm going to keep calling them 'boot covers').
This is a great method for fancy dress or cosplay, to make existing footwear more appropriate to the costume. Plus, it doesn't
damage your boots :) It's especially good if modifying cheap footwear isn't an
option due to your shoe size or medical conditions that restrict the sorts of
footwear you're able to wear.
You'll need:
For the pattern:
- Your boots/shoes
- (If applicable) the trousers you'll wear the boots over
- Cling film (plastic wrap!)
- Sticky tape or packing tape
- Marker pen
- Scissors
- A friend to help (optional)
For the boot covers:
- Pattern (see above!)
- Fabric
- Zip for each cover*
- Scissors
- Matching thread
- Elastic (approx 1/2" wide)
- Dressmakers pen/pencil/chalk
- Dressmaking pins
- Sewing machine (or a needle for hand-sewing and lots of patience)
* Either open or closed-ended zips, dependent on how long
you intend the boot covers to be. In the past I've used open-ended ones the
length of the covers, but this time I used shorter ones as I was making
over-the-knee covers and didn't think I'd find zips that long!
Edit: Seriously use long zips. Zips that let you unzip the cover entirely, if possible. It makes these so much easier to get on/off!
Note: This is a
LONG tutorial, though it's relatively easy to make these. So I've put in
headings:
You can click these to skip to the necessary section :)
Labels:
cosplay,
craft,
fancy dress,
sewing,
teen-friendly,
tutorial
Monday, 13 July 2015
Vintage Picnic Window Display
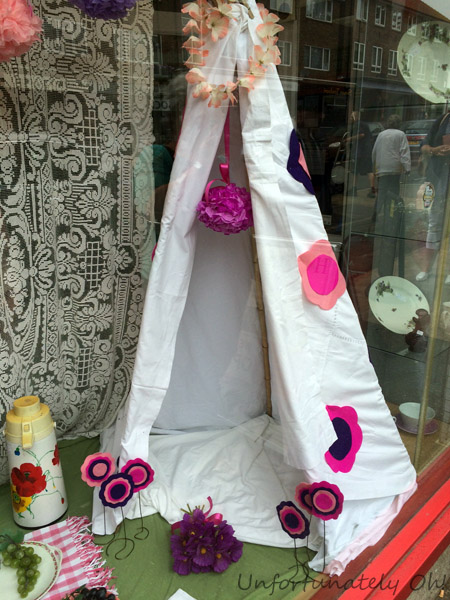
Today I pulled together yet another charity shop window display, for Humanity at Heart.
This is another one that has been planned for a while, which gave me time to make a few things to enhance the finished 'look'.
The theme this time was 'Vintage Summer Picnic'. The manager and I envisioned chintzy china, picnic baskets, pom poms and flowers a plenty!
Over the past months, the shop has collected donations specifically for the window, so there were plenty of items to put in the display. I particularly loved the big basket, and some adorable Minton cups and saucers (which sold before I had a chance to take photos!)
The yarn pom pom garland was put together a few weeks ago on a day that I found myself at a bit of a loose end. The pom poms were from a massive batch that Samantha (At home with Mrs H) sent me forever ago! (I finally used them!!!) I simply used a darning needle to thread them onto jute string.
I spent an evening last week making the tissue paper flowers/pom poms, which I hung from pink ribbon left over from another project. It was no good for sewing with, but perfect for this!
I hung another of the tissue paper flowers in the entrance of the teepee.
The teepee was constructed using bamboo sourced from the shop's garden and donated fabrics. I decorated it with some retro-styled felt flowers, which I made using donated and leftover felt.
I also made the self-standing retro flowers using the felt and some old wire coathangers.
This window turned out really nicely, and shows what a difference it makes to plan ahead.
Hopefully it will encourage more people into the shop, to look at all the lovely stock available!
To see some of my past window displays, check the window display tag.
Labels:
charity,
summer,
window display
Friday, 26 June 2015
Anyone for Tennis? (Or Pimms?)
Summer is the time for tennis, and with Wimbledon just around the corner, I ended up creating a tennis-themed display for the charity shop!
It seemed like a fun idea to set up the window as if it were a tennis match, so I got to work with sports gear, and lots and lots of balls...
Labels:
charity,
sport,
summer,
window display
Subscribe to:
Posts (Atom)