Tuesday, 8 February 2011

Tutorial: Recycled Soft Drink Can Hanging Heart


Part four of my hanging heart tutorials! This time the material of choice is an aluminium soft drink can, so not only does this how-to produce a cute, minimalist heart, but it’s eco friendly, too!
This light-weight heart will flutter in the breeze if you hang it outside.


Time needed: 30 minutes

You’ll need:
Empty soft drink can (wash & dry first!)
Stanley knife
Scissors
Round nose pliers
Flat nose pliers
Marker
String or ribbon
1 large split ring
Cutting mat
Heart template

Caution: This metal can have sharp edges when cut and you might find tiny fragments fall off during the cutting process. Handle cut metal with care and wipe your work surface off with a damp piece of kitchen roll when you’ve finished to pick up any tiny pieces of metal.


1. Using the Stanley knife, make an incision across the top of the can big enough to insert the end of your scissors. Cut the top off the can with scissors and repeat with the bottom of the can. Cut up the length of the can.
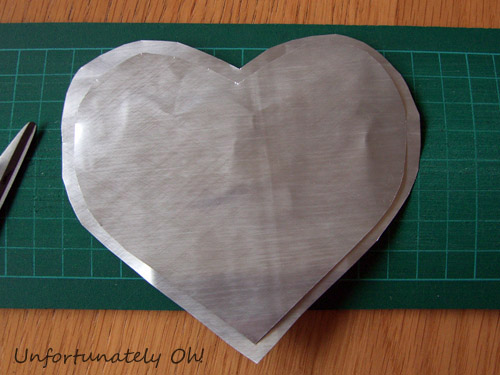


2. Flatten the can out and cut one heart from your template. Using this heart as a guide, cut out a second, larger heart (leave an extra 0.5-1cm around the edge)


3. Lay the two hearts together. Either turn the print inwards to yield a silver-coloured heart, or keep the print on the outside for a truly recycled effect. Make small cuts around the edge of the larger heart to make little tabs


4. Curl over the ends of the tabs with round nose pliers, and then use flat nose pliers (or your fingers) to flatten down onto the smaller heart. Take care not to press the tabs too hard else they may snap off! This step eradicates any sharp edges.


5. Turn the heart over to the ‘clean’ side and make a mark for a hole. Use the Stanley knife to cut a tiny X over this mark.


6. Poke a pen or the end of the round nose pliers through to open the hole. Turn the heart over and flatten down the edges of the hole with flat-nosed pliers.


7. Attach a large split ring through the hole and thread on a piece of string or ribbon.

Painting: If you want to paint your heart, enamel paint is a good option!

Monday, 7 February 2011

Tutorial: Beaded Hanging Heart


Pin It


The third instalment of my hanging heart tutorials!

This one is much quicker to make and requires very little skill, so if you lack confidence with a needle and thread, this is the tutorial for you! 
Read on to find out how to make a simple hanging heart with beads.


Time needed: 5-10 mins

You’ll need:
Jewellery wire
Assortment of beads
Ribbon, leather cord or similar
Side cutters
Round-nose pliers


1. Cut a length of wire and fashion loosely into a heart shape, leaving a few centimetres extra at either end. Don’t bend the wire too sharply else threading beads might be difficult!


2. Thread beads onto the wire. I chose to use a selection of natural-coloured wooden beads and a larger, contrasting red bead.


3. Wind the two ends of wire together and bend with round-nose pliers to make a loop.


4. Cut a length of leather cord or ribbon and tie onto the metal loop.


5. Bend the wire a little more as necessary to better define the heart shape.

Sunday, 6 February 2011

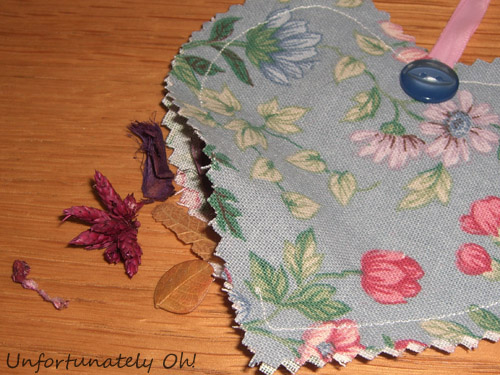
Tutorial: Scented Hanging Heart


Here’s the second of my hanging heart tutorials. This one is pretty similar in method to the fabric heart tutorial, but produces a different looking result.


Time needed: 20-30 mins

You’ll need:
Fabric
Thin ribbon
Button
Dried lavender or pot pourri
Needle and thread
Pinking shears
Heart template
Toy stuffing (optional)
Sewing machine (optional)


1. Draw and cut out two hearts with pinking shears. Place together, right side facing outwards.


2. Cut a piece of ribbon, fold in half and tuck the end between the two sides of the heart, top centre. Pin in place.


3. Sew around the edge, leaving a seam of approximately 0.8cm. Leave a gap for filling the heart!


4. Sew a button onto the heart, below the ribbon.


5. Fill with lavender or pot pourri. You could either fill the heart entirely with a scented filling, or just add a small amount and fill the rest with toy stuffing. (I added some stuffing to mine, since the pot pourri I have isn’t great for this project.)


6. Sew up the opening and you’re done!

Saturday, 5 February 2011

Tutorial: Fabric Hanging Heart With Charm


Hanging hearts are everywhere you look, made of all kinds of materials in countless styles from country cottage chintz to smooth, metallic modernism.

Over the next few days, I’ll be posting to tutorials on how to make various types of hanging heart, so get your crafting stash at the ready and keep checking back for more!

Today’s tutorial is one of the simplest: a fabric hanging heart with a decoration on the front.


Time needed: 20-30 minutes

You’ll need:
Fabric for heart
Contrasting coloured felt
Thin, contrasting ribbon
Contrasting button
Heart charm
Needle and thread
Toy stuffing
Heart template


1. Draw out two heart shapes onto the wrong side of the fabric and cut out, leaving a 0.8cm seam allowance.  Pin the two pieces together right side in.


2. Cut a piece of ribbon to hang the heart with (I used 22cm). Fold in half and slip between the two sides of the heart, leaving a centimetre extra outside. Pin in place.


3. Sew around the heart, leaving a few centimetres gap for turning the heart the right way around. Be careful that you don’t catch the ribbon in your stitches! (I made sure the ribbon came out of the gap I left, so it didn’t get in the way.)


4. Turn the heart inside out and sew a button beneath the ribbon. Fill with toy stuffing and sew up the open edge.


5. Sew (or glue) a square of felt to the centre front of the heart, then sew a heart charm into the centre of that. I got my heart charm from Minerva Beads and Crafts.


And you’re done!


Come back tomorrow for the next tutorial!

Wednesday, 2 February 2011

Tutorial: Ruffled Heart Wreath

Remember the florists’ hearts that I posted about recently?
Today I was inspired, and used one to create this heart-shaped wreath.

This was made with items I already had (or scrounged), but everything is cheap to buy so this little project won’t break the bank!

Here’s a tutorial for how you can make your own ruffled heart wreath. Of course, you don’t have to put a heart in the centre--it can be anything you wish! 


Time needed: 45-60 minutes

You’ll need:
Heart for centre of wreath--why not make your own (tutorial coming soon!), or buy one of these cute hanging hearts?)
Wire or wire coat hanger
Broad ribbon (you’ll need a lot) or fabric to make ruffles
Thinner ribbon for hanging
Tape
Dressmaking pins or needle & thread/glue
Side-cutters (if using coat hanger)


1. Make your wire into a circle, winding the ends around each other. Cover this part with tape to keep it more secure (and to avoid scratching yourself on sharp edges!)
If using a coat hanger, cut off the hook and reshape as described above (or use the hook to hang your wreath)
Shape the circle into a heart.


2. Set your heart in the centre of the wire frame and cut a piece of thin ribbon that is just over twice the length between the top of the heart and the wreath. (Skip this step if you bought/made a heart with a loop already attached)


3. Loop the ribbon over the top centre of the wreath frame and attach to the heart. Since I had an attack of the lazies, I simply used a couple of dressmaking pins, but glue is just as good an option!

4. Make a second loop for hanging your wreath by cutting another length of the thin ribbon. Loop this over the top centre of the wreath and the ribbon you already attached.


5. Ruffle your ribbon! For my wreath I used some previously ruffled fabric left over from a costume project. The wreath took approximately 2.9m of this. 
To ruffle ribbon, sew a running stitch down the centre and pull to gather, then stitch again on a sewing machine to secure.
For ruffled fabric, sew a long tube (right side in), turn inside out and then ruffle as with the ribbon. You’ll need 2.5-3 x as much ribbon/fabric as you want the resulting ruffles to be (e.g. For 3 m of ruffles you’ll need 7.5-9m of ribbon).


6. Tape one end of your ruffled ribbon to the top of the wire frame, one side of the loop. Wind the ribbon over a few times to hide the tape.


7. Wind the ribbon over the wire frame until no more wire is visible. For a thinner wreath, wind the ruffled ribbon tightly and sparsely; for a broader, more ruffled look wind it looser and bunch it together more. 


8. Wrap the end of the ruffles over the top centre of the heart to hide where the loops are attached. 


9. Secure the end at the back of the wreath with a dressmaking pin, or sew/glue.


10. Find somewhere nice to hang your shiny new heart-shaped wreath!


Suggestions:
For a variation on this, attach some artificial flowers to points of the wreath.


This wreath-making method can of course be adapted for any occasion!

Monday, 31 January 2011

Tutorial: Button Badge Heart Picture

Button Badge Heart Picture by Brigitte Herod
£175 at Rockett St George
(Also check out the Scrabble LOVE YOU Picture, £59)

 Much as I love Brigitte Herrod’s ingenious ‘Button Badge Heart Picture’, I’m far from able to afford the £175 price tag.

So I got out my huge collection of badges and worked out how to make my own for free!
 
 My version; cost: free
Pin It

Here’s an easy-to-follow tutorial for how to make a button badge heart picture of your very own.
You can either make a temporary version or a permanent version, depending on whether or not you want to reuse the badges!


Time needed: 1-2 hours

You’ll need:
Large selection of badges (try ebay for job lots)
Paper/card/board for background
Pencil
Blu-tack (for temporary version)
Glue gun (for permanent version)
Frame (optional)


 1. Lightly draw a heart shape onto your background (I used a page from an A3 canvas paper pad). It doesn’t have to be perfect because you’ll adjust the shape as you go. 


2. Decide how you want to set out your badges. Start by setting some around the edge of the heart and then fill up the space inside. 


3. Stick the badges to the background. If using blu-tack, use a decent-sized piece on the pin of each badge. In cases where the badges overlap, stick a bit of blu-tack to the underside rim and affix the badge to the badge(s) it overlaps with. Work in a similar fashion if using a glue gun.


4. Once you’re finished, check all badges are attached securely and frame or display as wished.


Suggestions:
  • If making this as a gift, include badges that are personal or hold special memories--a favourite animal, cartoon character or beverage, badges from trips out, etc.
  • Experiment with colour and patterns. This could be the background or the badges e.g. outline the heart with all red badges and fill the inside with black and white badges, or glue old newspaper to some board to great a more interesting background.
  • If you don’t have enough badges, why not try something else? Buttons, bottle caps, even jam jar lids could make a stunning alternative.

Related Posts Plugin for WordPress, Blogger...